
I usually don't wear much makeup- moisturizer, a little concealer, mascara, chapstick, bah-BAM! I'm out the door. Granted, now that I have a job, I wear a little bit more- mineral foundation, a tiny bit of blush, and a swipe with the greatest thing since sliced bread, the Covergirl smoky eye cream stick thingamabob.
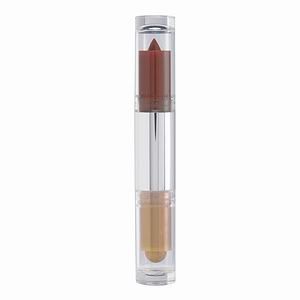 (CoverGirl Smoky ShadowBlast in bronze fire. Seriously. Lifesaver!)
I used the wedding as an excuse to splurge a little bit on some new makeup and snatched up some snazzy new items to try. I also checked out Miss Rainbow's posts- she's a makeup artist and had some GREAT tips!
I figured I'd do my makeup trial at some point, but I was cleaning out the rec room this morning (which is currently Wedding Central) and found my pile o' makeup and thought "Huh...eh, why not."
So thus it begins!
I started out by washing my face with my trusty Noxzema Wave. My skin doesn't like cleansers- I get dried out in seconds. I usually use the St. Ives apricot scrub, but it seemed like a little much. So Noxzema Wave it was. I followed it up with Clean 'n' Clear toner, which is a standby from my high school days.
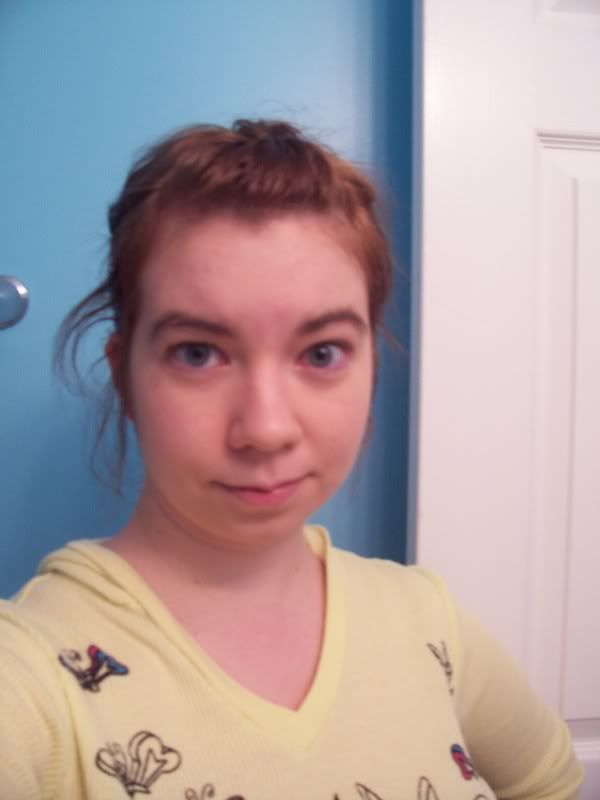 (No makeup whatsoever! Notice the quizzically skeptical eyebrow...what am I getting myself into?)
Now that I was squeaky clean, I checked out Miss Rainbow's "signature cocktail." I love it, but I ended up modifying it to suit my needs. I definitely used the Monistat chafing gel (who knew it was the same formula as primer?!), but I used my standard moisturizer instead of Cetaphil. The only Cetaphil moisturizer was in a big jug for ten bucks, so I stuck with my usual St. Ives moisturizer. And I couldn't find any MAC Studio Fix Fluid...mostly because the MAC store at the Green Hills Mall scares the pants off me. Go ahead, ask Keeton about the time we ninja'd around it. And it's on a corner, which makes it harder.
In any case, I grabbed a foundation I've been dying to try: Maybelline dream liquid mousse with an "airbrush finish." Then I stared at my three vials for a while, wondering exactly how to blend the three together. I started to put it all on my finger, since she recommends using your fingers. I chickened out at the last minute and put it all on a sponge.
I applied it the same way I apply theater foundation, and was pretty happy. It still looked a little sparse in spots, so I put on a tad more foundation and liked that. I'll probably try again with mixing just the Monistat and the moisturizer, and then putting the foundation on top.
Then I buffed it with a skunk brush. OH MAH GAH. Where has this been all my life?! The skunk brush buffed everything out all nice and smooth. I just love it. It's just one of the Target Studio Tools brushes, but it's simply love. If there was a fan page on Facebook for it, I would sign up.
Miss Rainbow says she doesn't use concealer, but since I didn't use the MAC stuff (although I might brave the MAC store for it) I used a little bit. My everyday concealer is actually a cream stick, but for this I got the CoverGirl 24-hour liquid stuff. It went on pretty smoothly, except on my forehead. But I have bangs, so this won't really be a problem.
Then I realized I didn't have any setting powder. So I resorted to a theater trick- baby powder. I grabbed the bottle, patted some into my hand, and then buffed it onto my face. It seems to work, but I think I'm going to go with Miss Rainbow and order the powder she recommended. I don't want my face to smell like a baby when I go in to kiss the hubster. But at least I can get a good feel now of what the makeup will be like.
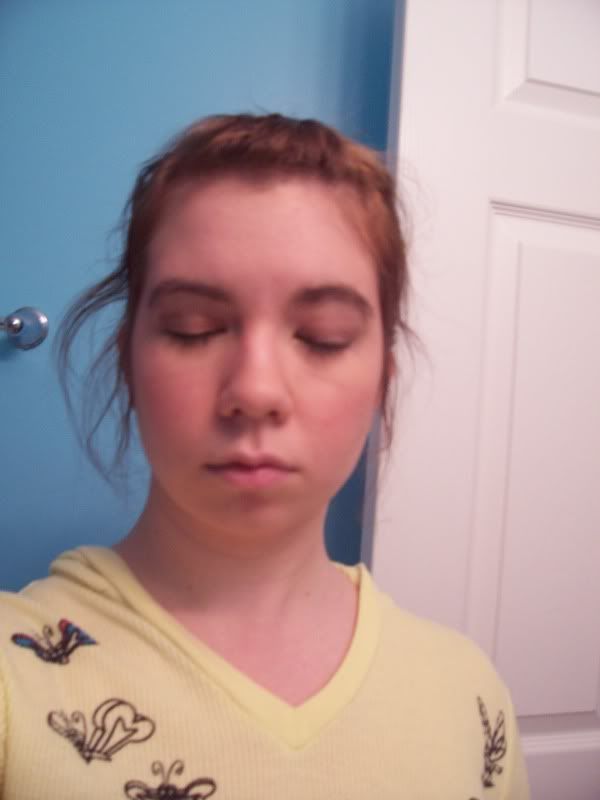
 (Yay, nice and smooth! But you can still see the cool little freckles around my eyes!)
So far I'm pretty happy. I feel I can master the blend of moisturizer, primer, and foundation better- if you stare at my right cheekbone, it's a bit streaky. And my face smells like baby. But all in all, the test is going well so far! Time for part 2.
I read over Miss Rainbow's instructions for contouring first, then got started. I ended up blending her tips with what I usually do.
For a midsized theater space (meaning the audience is a fair distance, but not a cavernous hall), I usually begin with a water-based pancake base or a CoverGirl clean liquid makeup and then layer it with normal blush. Unless I'm playing an old character (I typically play very young or very old) I don't need much age. This is from Beau Jest in fall 2009, when I played Miriam Goldman.
 You can see the contouring on my cheekbones and some light lines on the corners of my eyes and my nasal-labial folds. Miriam isn't terribly old and it was a fairly intimate theater, so I didn't need a lot.
On the other hand...
Just one month later I played General Cartwright in Guys and Dolls in a large proscenium theater. Holy decrepit, Batman!
 Now there's contour lines on my cheeks, chin, sides of my nose, nasal-labial folds, and my forehead. When I turn to the side, you can also see shading on my jawline. And keep in mind that this was taken with flash- it was much stronger in person!
All this to say, I guess, that it just goes to show you how much contouring can do. It can do a lot to streamline your face and shape it properly.
So I picked up CoverGirl's contouring blush in Refined Rose. It has three shades- dark, medium, and light. I started with the medium on the apples of my cheeks and buffing it back. One of my favorite theater tricks is that you should brush your blush from the apple of your cheek up towards the top of your ear. If you brush from the apple downwards, it makes your cheeks look longer and flatter- it's actually how you apply a man's makeup for the stage.
(On a side note, it's hilarious to see a boy who forgets and brushes up instead of down. The end result looks pretty silly.)
I brushed just a bit of the darker shade on my jawline, my cheekbone, and the sides of my nose. The reason for the latter is because it can make your nose look thinner if applied properly. I also put it on my jawline because I hate my chin- I feel like a Simpsons character.
I applied the highlight just like Miss Rainbow recommended, and I love the final result. My face looks so nice and polished!
 (Contouring on the left, nuthin' on the right. See the difference? Sorta? Maybe?)
Now it's time to venture into unknown territory, since Miss Rainbow hasn't done any tutorials for eyes and lips. (Although if she ever does...I'll definitely read them and try them out!)
I started with eyeliner. I used CoverGirl's liquid liner in black-brown. WOW that stuff goes on sharp. I ended up grabbing a little brush and smudging it just a bit, which helped. I lined the top lash and the outer corner of the lower- it makes my eyes look larger and more open.
Then...I realized another crucial mistake. I forgot to get eyeshadow! I rummaged through my theater makeup box and dug out two old ones to test. I want a lightly smoky eye, so I found two different brown sets that might work.
 (Two different shadows!)
The left eye was Almay's Blue Intensify set. I use it for auditions and dressy occasions. It's fairly reliable and does make my eyes look bluer, but I don't know if the coppery shade of the main tone works well.
The right eye is a Maybelline four-color set. I bought it for The Effects of Gamma Rays on Man-in-the-Moon Marigolds (I played Janice Vickery). I don't think I like it, though. It looked fine for the performance in the black-box theater, but for a wedding it just looks kind of dirty.
In any case, I used the same basic setup- the middle tone on my eyelid, the dark tone in the crease and lower lash, and the light tone on the inner corner, under the eyebrow, the middle of the lid edge (just above the pupil) and right underneath the lower lashline.
Eh, I'm not all that excited about either one. I'll have to try it again (unless someone really likes one of the ones I tested!)
Next: mascara. I'm sticking with my tried-and-true favorite: CoverGirl Lashblast. I bought a new (waterproof! waterproof! waterproof!) bottle in black for the wedding, so for this here trial I just used my old and almost empty one. But before I did, I curled my lashes for the first time.
I've never curled my lashes before- they're naturally very long and dark and curly. (I think it's karma's way of balancing out my Simpsons chin.) But I bit the bullet and got a cheapie one to try it out. It didn't really look different, but it did make the mascara go on easier.
Speaking of which, I followed my usual theater M.O. It goes a little something like this:
#1: Lightly coat the top lashes and give it a second or two to set.
#2: Go back over the top lashes. Look up and slide the brush through your lashes from base to tip, wiggling it slightly back and forth as you go.
#3: Lightly coat your bottom lashes while the top lashes dry.
#4: Go back over your top lashes with one last light coat.
I swear, it stays all day and looks like I have on fakes. As I type this I can see my lashes as I blink! Awesome sauce.
Now for the last step, the lips. My plan is to wear a light shade for the ceremony and the first part of the reception to match my princess gown, and then put on a bright red lip to match my retro lace-and-tulle reception dress. So I picked up CoverGirl Outlast lipstain in Teasing Blush, and CoverGirl Outlast All-Day Lip Color in coral. I usually only wear cherry chapstick for moisturizing and a slight bit of color, but I love lipcolors!
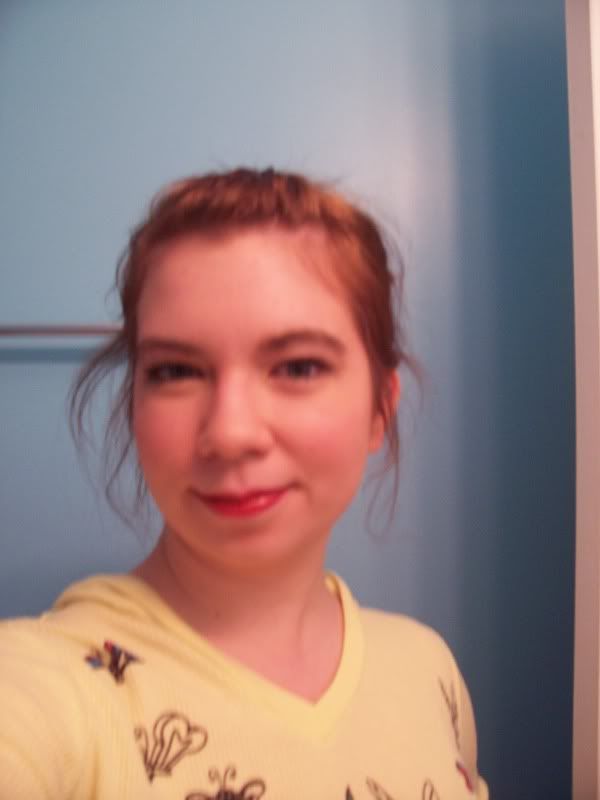
 (The lipstain! Oh, and mascara. Mm, mascara!)
The lipstain was a little odd- I felt like I was drawing on my lips with a sharpie! It also looked really dark when I put it on, but I blotted it lightly by pinching a tissue between my lips, and it came out a lovely medium shade of pink. It's also incredibly precise! I feel like I have the perfect princess pout to go with my gown.
The only thing I don't like is that my lips feel a bit dry, and look very matte. I'm going to wear the lipstain to work on Saturday (10am-5pm) and top it with cherry chapstick to see how it works.
I also might have to grab P and give him a kiss to see how the lipstain/chapstick combo works with him. I don't think he'll mind my research.
 (the lipcolor!)
The lipcolor is slightly different. And when I say "slightly different," I mean "hardcore." First you must apply the color and let it dry for 60 seconds without your lips touching. It was kind of like applying a gloppy lip gloss that smells like vanilla frosting. So in other words, it was like middle school.
Once it dried, I applied the balm-like topcoat. It went on smoothly, and not a bit of color rubbed off on the topcoat stick. It looks sassy and deliciously retro, and doesn't make my teeth look nasty!
I got so excited by all this makeup goodness that I did a bad thing and did my hair. (Always do your hair before your makeup!) I pulled the top and sides back and fastened it with a a little tortoiseshell comb. Then I pulled out the Conair instant heat hot rollers that have been my steadfast sidekick through cheerleading and performances. I have three sizes, so I used the smallest around my face, the medium on the top, and the largest on the bottom. Once I was properly rolled, I sprayed it lightly and let it sit.
Once the rollers were cool, I took them out, schmeared a little Garnier anti-humidity smoothing milk on my fingers, and finger-combed the curls out. It's not precise in the slightest (ew, the ends!!), but it gives me a decent idea of what I might could possibly do if I have to do my own hair.
 (tadaaaaa!)
And then I took the ultimate test- I took a picture in a dark room with flash just to see what the makeup looks like. The answer: awesome.
(I also took out the comb and added the headband I might wear with my second dress.)
 (vampin' it up!)
So what do you think?
I figured I'd do my makeup trial at some point, but I was cleaning out the rec room this morning (which is currently Wedding Central) and found my pile o' makeup and thought "Huh...eh, why not."
So thus it begins!
I started out by washing my face with my trusty Noxzema Wave. My skin doesn't like cleansers- I get dried out in seconds. I usually use the St. Ives apricot scrub, but it seemed like a little much. So Noxzema Wave it was. I followed it up with Clean 'n' Clear toner, which is a standby from my high school days.
(No makeup whatsoever! Notice the quizzically skeptical eyebrow...what am I getting myself into?)Now that I was squeaky clean, I checked out Miss Rainbow's "signature cocktail." I love it, but I ended up modifying it to suit my needs. I definitely used the Monistat chafing gel (who knew it was the same formula as primer?!), but I used my standard moisturizer instead of Cetaphil. The only Cetaphil moisturizer was in a big jug for ten bucks, so I stuck with my usual St. Ives moisturizer. And I couldn't find any MAC Studio Fix Fluid...mostly because the MAC store at the Green Hills Mall scares the pants off me. Go ahead, ask Keeton about the time we ninja'd around it. And it's on a corner, which makes it harder.
In any case, I grabbed a foundation I've been dying to try: Maybelline dream liquid mousse with an "airbrush finish." Then I stared at my three vials for a while, wondering exactly how to blend the three together. I started to put it all on my finger, since she recommends using your fingers. I chickened out at the last minute and put it all on a sponge.
I applied it the same way I apply theater foundation, and was pretty happy. It still looked a little sparse in spots, so I put on a tad more foundation and liked that. I'll probably try again with mixing just the Monistat and the moisturizer, and then putting the foundation on top.
Then I buffed it with a skunk brush. OH MAH GAH. Where has this been all my life?! The skunk brush buffed everything out all nice and smooth. I just love it. It's just one of the Target Studio Tools brushes, but it's simply love. If there was a fan page on Facebook for it, I would sign up.
Miss Rainbow says she doesn't use concealer, but since I didn't use the MAC stuff (although I might brave the MAC store for it) I used a little bit. My everyday concealer is actually a cream stick, but for this I got the CoverGirl 24-hour liquid stuff. It went on pretty smoothly, except on my forehead. But I have bangs, so this won't really be a problem.
Then I realized I didn't have any setting powder. So I resorted to a theater trick- baby powder. I grabbed the bottle, patted some into my hand, and then buffed it onto my face. It seems to work, but I think I'm going to go with Miss Rainbow and order the powder she recommended. I don't want my face to smell like a baby when I go in to kiss the hubster. But at least I can get a good feel now of what the makeup will be like.
(Yay, nice and smooth! But you can still see the cool little freckles around my eyes!)So far I'm pretty happy. I feel I can master the blend of moisturizer, primer, and foundation better- if you stare at my right cheekbone, it's a bit streaky. And my face smells like baby. But all in all, the test is going well so far! Time for part 2.
I read over Miss Rainbow's instructions for contouring first, then got started. I ended up blending her tips with what I usually do.
For a midsized theater space (meaning the audience is a fair distance, but not a cavernous hall), I usually begin with a water-based pancake base or a CoverGirl clean liquid makeup and then layer it with normal blush. Unless I'm playing an old character (I typically play very young or very old) I don't need much age. This is from Beau Jest in fall 2009, when I played Miriam Goldman.
You can see the contouring on my cheekbones and some light lines on the corners of my eyes and my nasal-labial folds. Miriam isn't terribly old and it was a fairly intimate theater, so I didn't need a lot.On the other hand...
Just one month later I played General Cartwright in Guys and Dolls in a large proscenium theater. Holy decrepit, Batman!
Now there's contour lines on my cheeks, chin, sides of my nose, nasal-labial folds, and my forehead. When I turn to the side, you can also see shading on my jawline. And keep in mind that this was taken with flash- it was much stronger in person!All this to say, I guess, that it just goes to show you how much contouring can do. It can do a lot to streamline your face and shape it properly.
So I picked up CoverGirl's contouring blush in Refined Rose. It has three shades- dark, medium, and light. I started with the medium on the apples of my cheeks and buffing it back. One of my favorite theater tricks is that you should brush your blush from the apple of your cheek up towards the top of your ear. If you brush from the apple downwards, it makes your cheeks look longer and flatter- it's actually how you apply a man's makeup for the stage.
(On a side note, it's hilarious to see a boy who forgets and brushes up instead of down. The end result looks pretty silly.)
I brushed just a bit of the darker shade on my jawline, my cheekbone, and the sides of my nose. The reason for the latter is because it can make your nose look thinner if applied properly. I also put it on my jawline because I hate my chin- I feel like a Simpsons character.
I applied the highlight just like Miss Rainbow recommended, and I love the final result. My face looks so nice and polished!
(Contouring on the left, nuthin' on the right. See the difference? Sorta? Maybe?)Now it's time to venture into unknown territory, since Miss Rainbow hasn't done any tutorials for eyes and lips. (Although if she ever does...I'll definitely read them and try them out!)
I started with eyeliner. I used CoverGirl's liquid liner in black-brown. WOW that stuff goes on sharp. I ended up grabbing a little brush and smudging it just a bit, which helped. I lined the top lash and the outer corner of the lower- it makes my eyes look larger and more open.
Then...I realized another crucial mistake. I forgot to get eyeshadow! I rummaged through my theater makeup box and dug out two old ones to test. I want a lightly smoky eye, so I found two different brown sets that might work.
(Two different shadows!)The left eye was Almay's Blue Intensify set. I use it for auditions and dressy occasions. It's fairly reliable and does make my eyes look bluer, but I don't know if the coppery shade of the main tone works well.
The right eye is a Maybelline four-color set. I bought it for The Effects of Gamma Rays on Man-in-the-Moon Marigolds (I played Janice Vickery). I don't think I like it, though. It looked fine for the performance in the black-box theater, but for a wedding it just looks kind of dirty.
In any case, I used the same basic setup- the middle tone on my eyelid, the dark tone in the crease and lower lash, and the light tone on the inner corner, under the eyebrow, the middle of the lid edge (just above the pupil) and right underneath the lower lashline.
Eh, I'm not all that excited about either one. I'll have to try it again (unless someone really likes one of the ones I tested!)
Next: mascara. I'm sticking with my tried-and-true favorite: CoverGirl Lashblast. I bought a new (waterproof! waterproof! waterproof!) bottle in black for the wedding, so for this here trial I just used my old and almost empty one. But before I did, I curled my lashes for the first time.
I've never curled my lashes before- they're naturally very long and dark and curly. (I think it's karma's way of balancing out my Simpsons chin.) But I bit the bullet and got a cheapie one to try it out. It didn't really look different, but it did make the mascara go on easier.
Speaking of which, I followed my usual theater M.O. It goes a little something like this:
#1: Lightly coat the top lashes and give it a second or two to set.
#2: Go back over the top lashes. Look up and slide the brush through your lashes from base to tip, wiggling it slightly back and forth as you go.
#3: Lightly coat your bottom lashes while the top lashes dry.
#4: Go back over your top lashes with one last light coat.
I swear, it stays all day and looks like I have on fakes. As I type this I can see my lashes as I blink! Awesome sauce.
Now for the last step, the lips. My plan is to wear a light shade for the ceremony and the first part of the reception to match my princess gown, and then put on a bright red lip to match my retro lace-and-tulle reception dress. So I picked up CoverGirl Outlast lipstain in Teasing Blush, and CoverGirl Outlast All-Day Lip Color in coral. I usually only wear cherry chapstick for moisturizing and a slight bit of color, but I love lipcolors!
(The lipstain! Oh, and mascara. Mm, mascara!)The lipstain was a little odd- I felt like I was drawing on my lips with a sharpie! It also looked really dark when I put it on, but I blotted it lightly by pinching a tissue between my lips, and it came out a lovely medium shade of pink. It's also incredibly precise! I feel like I have the perfect princess pout to go with my gown.
The only thing I don't like is that my lips feel a bit dry, and look very matte. I'm going to wear the lipstain to work on Saturday (10am-5pm) and top it with cherry chapstick to see how it works.
I also might have to grab P and give him a kiss to see how the lipstain/chapstick combo works with him. I don't think he'll mind my research.
(the lipcolor!)The lipcolor is slightly different. And when I say "slightly different," I mean "hardcore." First you must apply the color and let it dry for 60 seconds without your lips touching. It was kind of like applying a gloppy lip gloss that smells like vanilla frosting. So in other words, it was like middle school.
Once it dried, I applied the balm-like topcoat. It went on smoothly, and not a bit of color rubbed off on the topcoat stick. It looks sassy and deliciously retro, and doesn't make my teeth look nasty!
I got so excited by all this makeup goodness that I did a bad thing and did my hair. (Always do your hair before your makeup!) I pulled the top and sides back and fastened it with a a little tortoiseshell comb. Then I pulled out the Conair instant heat hot rollers that have been my steadfast sidekick through cheerleading and performances. I have three sizes, so I used the smallest around my face, the medium on the top, and the largest on the bottom. Once I was properly rolled, I sprayed it lightly and let it sit.
Once the rollers were cool, I took them out, schmeared a little Garnier anti-humidity smoothing milk on my fingers, and finger-combed the curls out. It's not precise in the slightest (ew, the ends!!), but it gives me a decent idea of what I might could possibly do if I have to do my own hair.
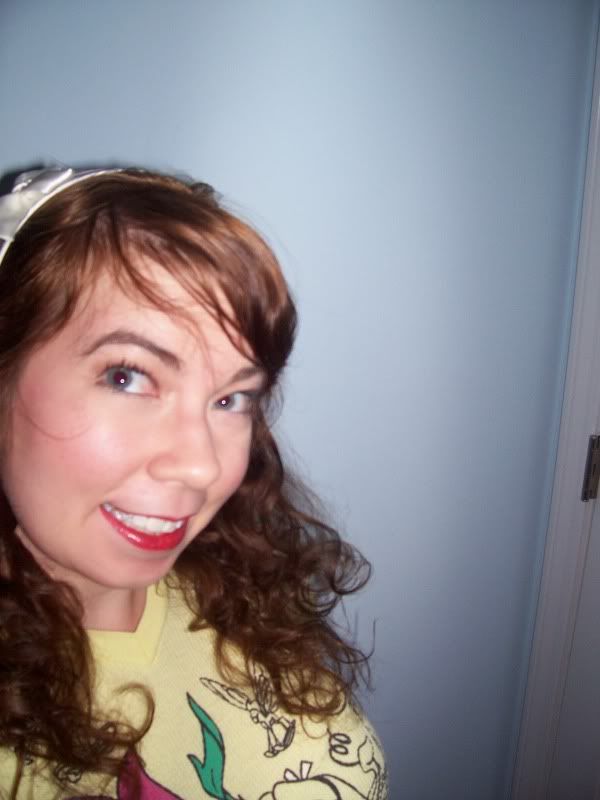
(tadaaaaa!)And then I took the ultimate test- I took a picture in a dark room with flash just to see what the makeup looks like. The answer: awesome.
(I also took out the comb and added the headband I might wear with my second dress.)
(vampin' it up!)So what do you think?